Calculating moisture loss from the egg during the incubation process is a vital tool in achieving good chick quality and hatchability. This allows you to know just how much water is being removed from the egg during incubation.
There are many factors to consider in achieving optimal moisture loss, and these can include humidity settings, damper positioning, variation in ventilation tolerances and atmospheric conditions. The percentage of moisture loss can vary according to the age of the breeder flock, seasonal influences or egg size. There are visual signs from the egg and the chick that can indicate moisture loss levels are adequate to achieve maximum hatchability and chick quality. Measuring moisture loss is an essential tool in helping obtain high chick quality and low seven-day mortality.
Calculating moisture loss
What is the correct method for calculating moisture loss? The first step is to identify specific hatching trays for the exercise. We recommend weighing three to five tray positions per flock or incubator. These hatching trays should be properly identified throughout the incubation process to ensure continuity.
Place these identified trays in different locations throughout the incubator to achieve the best calculations on moisture loss. The trays should be placed in the top, middle and bottom of the setter cart or fixed rack system. To increase accuracy of the data, try using the same locations when placing the trays.
This practice should be done each hatch day, and the minimum basis for evaluation should include one young, one prime and one old flock source per hatch day. A common practice would be to obtain a moisture loss percentage each week on each flock source used at the hatchery.
Weigh the empty setter tray.
Weigh the setter tray with eggs in it just before incubation.
The weight of an empty individual setter tray should also be known for calculation purposes. This specific setter tray will again be weighed at transfer to obtain the percentage of moisture loss. To begin the process, the setter tray with eggs in it should be weighed just before incubation. The eggs used in this calculation should be quality hatching eggs free of any shell quality issues, cracks or misshapen eggs.
Weighing each component in grams can help you achieve the most accurate detailed data. No eggs should be removed from the setter tray before calculating the weight at transfer time. If an egg has been broken or removed for some mechanical reason, then and only then should the replacement of an egg be performed. The egg used for replacement should be fertile with a viable embryo.
If the transfer time is a variable, all figures should be correlated back to one individual calculation. This process is simple and will ensure accurate useful data once collected. To make this calculation take the percentage of moisture loss divided by the actual number of days of incubation and then multiply by the desired days of incubation.
Record and Store Data
This information can be associated by flock, machine, incubation day or breeder flock age. The figures should be placed inside a database or spreadsheet so that the data can be referenced by hatch date, week, month or flock type. The more information that is collected, the more valuable the data becomes. This information can produce trends which allow comparisons to be made from one season to season, or year to year.
It is very important to know the moisture loss percentage by breeder age. The eggs from a breeder hen increase in weight and size as the flock ages. This increase in weight and size will dictate the percentage of moisture loss desirable by breeder flock age.
Incubators and Moisture Loss
There is a slight difference in moisture loss between single-stage incubation and multi-stage incubation. The single-stage incubation environment for hatching eggs is very accurate according to the age of the embryo. To achieve optimal moisture loss there are three different methods for removing the water from the egg in single-stage incubation.
The relative humidity percentage setting according to the specific day of incubation will help promote moisture loss. The removal of water is also influenced by the specific day that the damper on the incubator is allowed to open and to what extent. The final factor is the speed at which the ventilation unit is programmed to operate on certain models. These factors will influence how much and at what rate moisture loss is obtained.
The operation of a multi-stage incubator will require different tactics to attain the desired moisture loss. The multi-stage incubator works off an average of averages for temperature and humidity. This concept can and does work very well, but will require different methods for removing water from the egg.
There are two factors that can influence moisture loss rate in multi-stage incubation: relative humidity level in the incubator and the atmospheric conditions of the incoming air. The ability to make slight adjustments to these atmospheric conditions aid in obtaining correct moisture loss levels.
Signs of moisture loss
What are the signs from the eggs and chicks that moisture loss is sufficient? Many different aspects can be observed during and after the hatch process to indicate if the correct level of moisture loss is being obtained.
The first scenario, and perhaps most common scenario seen, is when not enough moisture loss is obtained. There are a number of different signs that can be observed that will indicate the total percentage of moisture loss is insufficient:
- Chicks pipping early
- Air cell too small
- Red or cut hocks
- Chicks hatch early
- Sticky chicks with debris attached to them
- Chicks larger than normal
- Dehydrated chicks

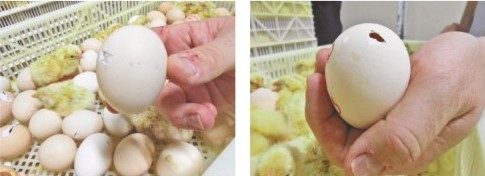
Left, correct pip location or enough moisture loss. Right, incorrect pip location or not enough moisture loss.
Troubleshooting
When the chicks are hatching earlier than desired due to insufficient moisture loss, this can look the same as when the incubation temperature is too high. The overall hatch window will shift earlier than desired. This can also lead to the chicks becoming more dehydrated at the time of pull. The moisture loss level needs to be evaluated to ensure the exact reason behind the shift in the hatch window.
The overall incubation temperatures can be correct, but if the moisture loss level is too low it can have the same effect as the temperature being too high. Be sure to understand which issue is causing the shift in the hatch window.
The air cell of the egg should be at least one-third of the egg or just above the equator of the egg at transfer. The location where the chick externally pips through the eggshell can be an indicator of proper moisture loss.
The incorrect positioning of the chick’s head during pipping can be a sign of insufficient moisture loss. The head of the chick should be level during the pipping process. If the head becomes inverted or tilted up in appearance, this is a sign of insufficient moisture loss.
Other signs of insufficient moisture loss are the appearance of red hocks or abrasions and enlarged bellies on chicks. The last indicator of deficient moisture loss can be sticky chicks with debris stuck to them. This debris is the inner shell of the membrane from the egg. The inner shell membrane will typically remain attached to the eggshell during the pipping process. When adhered to the chick, inner shell membrane is a sign of insufficient moisture loss.
The second scenario, and not as commonly seen, is when too much moisture loss is obtained. There are a number of different signs that can be observed that will indicate the total percentage of moisture loss is elevated:
- Embryonic death at 20 days (internal pip).
- Air cell too large.
- Chicks smaller than normal.
- Unhealed small, dried navels.
- Chicks that cannot stand or splayed legs.
When performing an egg residue breakout, it is important to look closely at the late embryonic mortality. When the chick has pipped through the inner membrane and not externally pipped, this can be a sign of too much moisture loss. Be sure to investigate these findings thoroughly to better assess the exact cause of embryo mortality.
A great method for determining the size of the air cell is by using a flashlight or torch just prior to transfer. When the air cell in the egg is too large, that can indicate excessive moisture loss levels. Measuring the overall length of a chick can help determine adequate moisture loss levels. When the chicks are below the standard length or smaller than estimated, this can be an indicator.
The evaluation of the chicks during a chick assessment can be used to help identify possible issues. When a chick has difficulty standing or they have a small, dried navel, this usually means they are overheated. These defects can also indicate excessive moisture loss from the eggs. It is important to better understand exactly why these chick quality defects are present and exact cause.
Summary
The use of moisture loss information is a vital tool that can help with chick quality and hatchability. The calculation formula should be checked to ensure that the equation is correct. The recommendations for moisture loss percentages are figured based on breeder flock age.
There are many signs from the egg, eggshell debris and day-old baby chicks that can help with diagnosing if moisture loss levels are adequate.


