by Guilherme Seelent, International Tech Service, Cobb-Vantress, Inc. www.cob-vantress.com
Managers of large hatcheries can not be responsible for all aspects of chick production and quality or the maintenance of incubators. Similarly, the manager can not rely solely on his own experience and intuitive observations to achieve good quality chicks. There must be a management system with procedures, indicators and quality goals to assist in the control of processes and teams.
It is up to the hatchery manager to organise global processes, coordinating different teams to work on specific tasks. It is necessary to write Standard Operational Procedures (SOPs) and establish the Critical Control Points (CCPs) aligned with the key process indicators, which will help in measuring the productivity and quality of the processes and the final product, day-old chicks.
The manager must evaluate the results and quality of the individual teams – and their combined results.
Here is an example of SOPs for day-old chick production:
- Quality control for received eggs.
- Disinfection of eggs. Preheating.
- Egg incubation and incubation program.
- Transfer/vaccinations in egg.
- Program and operation of the hatchers.
- Chick pull and quality control.
- Chick transportation.
- CCPs are traditionally related to risk analysis in food security programs. However, today, we are increasingly aware of CCPs related not only to the production of food without harmful contaminants (bacteria, fungi, etc) but also to other factors relevant to chick quality.

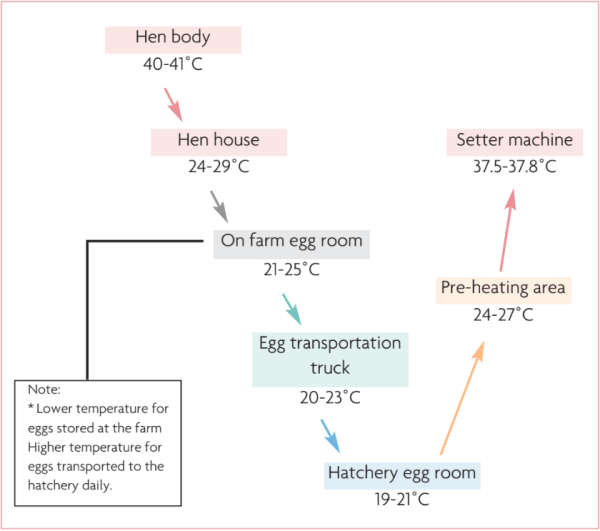
Fig. 1. Egg temperature flow chart (for fresh eggs).
Receiving egg temperature and egg room temperature
The temperature of the egg at reception is a critical point of control so the conditions of storage on the farm or with egg suppliers can be evaluated. Likewise, it is important to evaluate the room temperature in different parts of the hatchery egg store.
The embryo in the early stages behaves like a cold-blooded organism (poikilotherm), influenced by the ambient temperature.
Temperatures below ± 24 ̊C paralyse embryonic development, called ‘physiological zero’. The goal is to have all embryos at a similar developmental stage for a uniform hatch window. Fig. 1 shows the ideal temperature curve for eggs to achieve as few losses as possible. Note the reduction of temperature occurs gradually until the storage temperature, with no elevation of temperature until preheating. When measuring the temperature of eggs at the time of receiving, evaluate the condition of storage in the farm or eggs supplier, and also the transport conditions.
Likewise, egg storage in the hatchery should be in an environment with uniform, controlled temperature. Temperature differences will cause eggs to reach incubation temperature at different times and therefore hatch at different times, increasing the hatch window and affecting the quality of day-old chicks.

Photo of an egg store (above) and a tray of eggs (left) using a thermographic camera.
Egg temperature in preheating
The multi-stage incubator system has to cope with embryos in endothermic development and embryos in exothermic growth to maintain acceptable incubation conditions. When eggs are placed in a multiple-stage system, the goal is for all embryos to reach the ideal temperature as quickly as possible.
When the difference between egg temperature and control point of the incubator is very large, the time to reach the ideal temperature will be longer, negatively affecting the developmental uniformity of the embryos, the hatch window and chick quality.
Other undesirable factors are thermal shock and condensation. With incubation temperature of 37.5 ̊C and 55% relative humidity, the dew point (temperature at which condensation occurs) will be approximately 27 ̊C, so if we preheat the eggs we will avoid condensation.
However, it is fundamental to have a specific room for this purpose, designed to meet the demand and airflow to homogenise the entire egg load within the recommended parameters.
Efficient air circulation and correct room temperature are essential for uniform preheating of eggs. Preheating wrongly performed increases the hatch window – just the opposite of the preheating purpose. Even with good air circulation, it takes six hours for the eggs to reach 30 ̊C, regardless of the initial temperature. With poor air circulation, this process can take up to double this time. Therefore, the recommendation is:
• Provide good circulation of air around the eggs.
• Allow six to eight hours of preheating. Increasing one hour every
one to two days of stock from seven days, up to 12 hours maximum. Kaufman (1938) and Steinke (1972) found that prolonged egg storage causes delayed early embryonic

Fig. 2. Heat production of incubating eggs.
development at the start of incubation. In this process, establish a rate of temperature rise to avoid condensation. The most modern incubators, single stage, perform this process and can be part of the incubation program, not requiring an exclusive room for this purpose. Experiments performed by a supplier of single-stage incubators showed an ideal period of four hours of preheating having a positive effect on the hatch window, compared with longer periods of six, 12 and 24 hours. It is important to routinely check the temperature in several parts of the room or the machine to monitor the process and avoid losses due to delay in hatching.

Fig. 3. Distribution of egg shell temperature in a machine. A 39 week flock
at 17 days of incubation.
Temperature of the embryo in incubation
Undoubtedly temperature is the most critical factor in the incubation process. Several experiments and field results have shown how small differences in air temperature influence embryo development, hatchability, navel quality and posthatch performance. The temperature during incubation influences organ weight, development of the cardiac system, muscles and tendons.
However, the determining factor is not the temperature of the air, but the temperature of the shell which is a reflection of the temperature of the embryo. Egg shell temperatures of 37.5-38.06°C are optimal for the development of embryos.
Embryos kept with egg shell temperature very high (39.4 ̊C) during incubation have been shown to present shorter lengths of tibia, femur and metatarsus, worse navel score, lower body length, lower weight, higher residual yolk and lower stomach, liver and heart. Development of the bursa and thymus is reduced by elevated temperatures (37.8 vs 38.8°C, 40.1-40.6°C in the shell, 65 ± 2% RH) during incubation as observed in oneweek-old chicks with the symptoms of immunosuppression.
Higher egg shell temperatures during incubation (38.9°C) have been shown to affect the development of the cardiac muscle and may cause right ventricular hypertrophy and increased mortality especially caused by ascites.
On the other hand, low temperatures also cause great losses in the incubation process. They will prolong the incubation time, increasing the final mortalities, generating delayed chicks and chicks with excess humidity.
Fig. 2. shows the heat production curve of the embryo throughout incubation, increasing significantly after 10 days and reaching its peak at birth, and on days 18-19, before the transfer – the critical periods of temperature maintenance within the desired parameters.
Modern single-stage incubators have scanners that monitor shell temperature throughout the incubation process, modulating the machine to adequately meet the needs of the embryo. These tools make this task easier, manage data and achieve better results.
However, multiple stage machines do not have this tool and we must monitor those temperatures with a digital ear thermometer, making measurements at the top, middle and bottom of the shelves and in the back, middle and front of the machine to map high temperature points above 102 ̊F and make the necessary corrections.
The ideal time to perform this measurement is as close as possible to the transfer, which is the most critical moment of heat production, 17-18 days. With this information we will be able to estimate how much is subject to high temperatures and where are the critical points, as observed in Fig. 3.
Variations in egg shell temperature will also directly affect the hatch window and so chick quality. Embryos exposed to high temperatures will be born prematurely, just as embryos with lower temperatures will be born late.
Loss of humidity in incubation
During incubation the embryo needs to lose the correct amount of water until the internal pipping phase. If it retains too much water, it will be difficult to perform the internal pipping; if this loss is excessive, the risk is dehydration.
The egg loses moisture through the pores present in the shell, depending on the humidity level of the environment, the conductance of the eggshell, genetic line and the breeder age. Obviously nutritional and sanitary problems will affect the shell quality and consequently loss of moisture.
The best hatching in broiler eggs is reached with a moisture loss of around 12-14% when we compare the egg weight in incubation and at 18 days.
However, there are differences between recommendations for single-stage and multiple-stage systems. In multiple stages where embryos are at various stages of development, look for a moisture loss around 12-14%.
In single-stage systems, in addition to seeking smaller losses, from 911%, the incubation programs allow for this loss in specific phases of the process, in a non-linear way, adjusting for a greater percentage of loss in the final third of the process. In single-stage systems we can also adjust the moisture losses according to the breeder age, seeking smaller losses – 9-11% for younger breeder flocks and 1-13% for older flocks.
Moisture loss is an important, simple indicator for monitoring chick quality and incubation process. It can be managed by looking for variations over the months and adjusted according to past data. It should be measured at least weekly, in each breeder flock, and can be evaluated by incubator, making adjustments to achieve better results.
Hatch window
The hatching of eggs does not occur at exactly the same time, with a normal distribution over a 24-hour period. This is the hatch-window distribution, the interval between the first and last hatched chicks.
However, it is practically impossible to know exactly when the first and last chick were born, since it would be necessary to open the hatch several times, harming the hatch environment and quality of the chicks.
In practice, carry out measurements at specific periods before chicks are processed and then estimate the birth window – for example, 36 hours, 24 hours, 12 hours and at the moment of service. You should also evaluate trays at different points in the incubation to identify possible points of deviation.

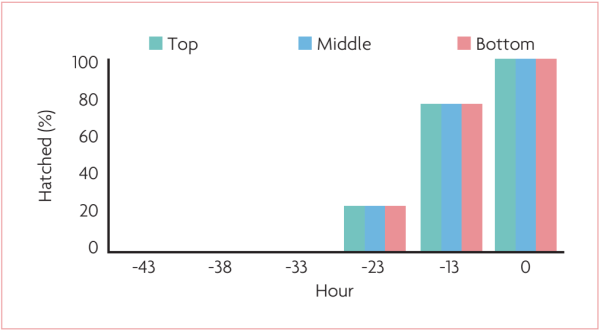
Fig. 4. Ideal hatch spread.
Fig. 4. shows the ideal distribution of births, with a higher concentration of chicks hatched around 12 hours before pull. Thus, when analysing the data cumulatively, you will have a distribution according to Fig. 5. with 100% of the chicks born according to the birth prediction of each flock. Several factors interfere with the hatch window:
• Breeder age.
• Conductance of the egg shell.
• Genetic line.
• Egg size. Chicks from smaller eggs begin the hatch process before chicks from larger eggs.
• Egg storage times.
• Incorrect preheating. Dispersing the temperature of the eggs at the time of preheating will affect the embryonic development and hatch window.
• Microclimates inside the machine and/or hatcher, causing differences in temperature.
• Incorrect handling of eggs on the farm.

Fig. 5. Ideal distribution of the hatch window.
Another factor is the incubation system. Multiple stage systems have a window from 28-32 hours, with single stage systems from 12-24, with significant impact on chick quality.
Scientific studies have shown the importance of the hatch window for the performance, mortality and maturation of the thermoregulatory and gastrointestinal systems of birds.
The hatchery manager needs to effectively manage the processes and evaluate the teams based on SOPs and CCPs to achieve the goals. The evaluation depends primarily on the quality of the data collected, either by individual instruments or teams.
Then the data must be assembled in a database so that deviations can be analysed and identified, and corrective measures taken to avoid losses and impacts on the overall results.


